Posts

Showing posts from July, 2010

Pasta Necklaces

Image
Today the students finished all of their pasta shrinky dink necklaces. They loved how the shrinky dinks shrunk. Today we took the pasta that we died the other day and put it on a piece of cotton yarn holding our shrinky dinks. The finished necklaces turned out awesome! To make the shrinky dink pendants, I took a 8 1/2 x 11 sheet of shrinky dink paper and cut it in half. Using previously drawn insect drawings, the students traced the drawing onto their shrinky dink paper and colored it in with permanent markers. Then, I took them home and shrunk them in my oven. Let me know what you think... Initial bug drawing on paper shrunken Shrinky Dink version Shows the size difference after shrinkage Finished necklaces

Nowhere Boy Trailer

Image
For over a year I have been waiting for this movie to come out. It was made and released in the UK in October of 2009. Its won a bunch of awards and has gotten 4 stars everywhere it's gone. Check out the American trailer. Its release day in the US is October 8th 2010. NOWHERE BOY!!!! If you can't wait that long... read the book John Lennon the Life , by Philip Norman. I'm a dork.... but it looks really well done.

Love for storms and a hatred for WIND

Image
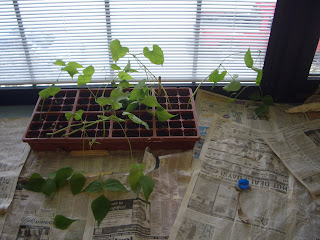
So I try to be a frontier man (with the help of the girlfriend) and grow a garden in the back yard of my still college house. I have planted a garden before, but in a much smaller fashion. I get all nifty and p lant everything from seeds. I work the soil and slave over the garden for a month without any results (actual food). Then comes July and the crop takes off, I have tomatoes five feet tall and 15 corn stalks, green beans, egg plant, five pepper plants, and three zucchini plants. Each stalk of corn has two ears of corn forming... an d then... WIND...RAIN... and TORNADO WARNINGS!!!!! Guess how my beautiful crop weathered th e storm... Not very well! All the hard work and its all gone. I was so bummed that I decided to tell my students the (boring) story. One of my students came u p to me while we were making the Shrinky Dink bugs and told me that her mom and dad have a garden, I quote "They have thousands of corns, Ill bring you ONE." Gotta love this job, I wanted to

Pasta .... Shrinky Dinks... food coloring

Image
When trying to think of something different for my students, I came across another art teachers blog, and got the idea to do a lesson dealing with pasta. The first class, the students learned how to die pasta using food coloring. I used three different kinds of pasta (all with holes). The students got around 35 pieces of pasta. The separated the pasta by the color they wanted them to be on their desks. Starting with the lightest color food coloring (yellow), the students placed the pasta they wanted yellow into their Ziploc bag. I came around and placed two drips into each bag. The students closed the bag and began to shake. They shook until they got the desired color. We repeated this for the next three colors. At the end I asked the students to pick one or two pieces of pasta from each color and place them back in the bag. Using the food color left in the bag, the students shook the bag once again to get multicolored pasta... (they loved this part). Place the pasta on a napkin with t

Sun Flowers

Image
Since it's summer, I thought it would be appropriate to have a lesson that dealt with plants and flowers. I brought in a little plastic planter with dirt and we planted sun flowers from seeds. The students loved being able to plant something and watch them grow over the weeks. To start the sunflower I handed out 4in x 4in yellow paper squares. I asked the student s to draw the biggest circle they possibly could on the yellow square. Once they finished, I told everyone to crumble up the paper. They were so surprised by this... they looked at me like I had lost my mind. When they crumbled it, I made it a contest to see who could make the smallest crumbled ball. We opened the paper up and did it two more times. Then, they cut out the circle and saved the paper scraps. On the upper half of a piece of paper, place the scraps on the page and glue the outer rim of the yellow circle. Put the circle on top of the scraps, forming a raised center. Using crayons, the students drew in the ped

MONSTERS

Image
In class last week we started to make paper mache monsters. I started the project with my students by reading a monster book to them titled, Big Lips, and Hairy Arms . After the book I sent the kids back to their desks and asked them to close their eyes and draw a big circle on a sheet of paper. After they made the circle, I asked them to make a monster out of the circle. I asked for legs, eyes, and arms, but didn't specify how many, or where I wanted them placed. This warm-up drawing got their creativity flowing. After they finished this drawing I asked them to divide a new piece of paper into three even parts. In each section the students wrote down a type of animal. Soon enough each section had a drawing of a monster with an animal feature. From all these drawing the students picked their favorite monster. The next class, I brought in recycled water bottles, tape, construction paper, and aluminum foil. With these four materials the students created unique skeletal monsters. The

Lessons Learned

Today was the second day of my fourth week teaching summer school. When I got the job I was asked to stop by the office of the principal in charge of summer school in my district. I went in and got my "paperwork," which included a folder and my class list. I thought it was strange that I wasn't asked to fill out a W-2 form or any other kind of forms. I never signed a contract or found out how much I was making. I was so excited to get my first chance to teach on my own, that I didn't ask questions. I grabbed my folder, smiled and walked out of her office without asking any questions. DON'T DO THIS.... EXCITING AS IT WAS, I STILL HAVE NO IDEA HOW MUCH I'M MAKING, AND I NEVER RECEIVED MY FIRST PAYCHECK! This is the first lesson learned this week. Make sure you ask questions, and when you think something isn't right, chances are .......things are not right. So today I finished teaching and drove to the district headquarters to talk to the payroll department.

Arts and Crafts - Summer School 2010

Image
First Day Discussed the word RESPECT.... I ask the students for the meaning of the word, and then we thought of the many ways we could use it in the classroom. Respect: other students, the classroom, and the teacher. After we talked for a little bit about what I respected from then for the next five weeks, I handed each student a paper circle. Each student was asked to sign the circle with their name and walk up to the wall and stick it on. The name circle acts as a type of contract. Finally its time for ART! I Have to give props to my Co-operating teacher during my student teaching (Thanks Deb) for this idea. At the elementary age students tend to finish art projects at all different times. Some take their time, while others speed through it in hopes of something greater. For those classes when you need something for students to do for 15 minutes whil e others finish I made sketchbooks for each student out of cereal boxes. Its cheap and easy, it just take a little work on your part to

My Dislike For Condiments

Image
As with the other plat es, I enjoy using the functional pottery surface as a canvas for expressing myself as an artist, and any other views or concerns I wish to express. In this four plate series I share my hatred for condiments with the viewer. On the face of the plate I display the chosen condiment. On the base / bottom of the plate I have my personal feelings and reasons behind my dislike for that particular condiment. I enjoy making plates. So many artist use the cup or tumbler as a surface for artistic design. The creation of the plate is such a complex and tedious process... I feel it deserves just as much attention as a dec orative surfa ce. The plate just like the cup has a bottom, outer wall, and an inside. I love making the viewer turn and flip the plate as they discover the meaning behind the design.

What I Like To Do

Image
The above images are recent works of mine. I uses stoneware clay to create a series of six plates that use decals to make the viewer uncomfortable. Everyone eats food off of plates and think nothing of what is on the plate other than the food. I wanted to make the plates into a work of art. As the food is eaten off the plate, it reveals the image or messages meant to make the viewer disgusted or uncomfortable.

My Hopes

What I am hoping from this blog is that other first year teachers find it comforting to read about my challenges and mistakes as I grow and learn as a teacher. I have just recently graduated from the University of Wisconsin Oshkosh. I got a degree in Art Education, and I am currently still searching for a full-time teaching position. Two weeks after graduation I was fortunate enough to land a summer school teaching position for five weeks. This is my first official teaching position, so as much as i'm terrified, I am evenly excited. For the five weeks I am responsible for teaching Arts and Crafts to two classes of 20 students. Each class includes and combines students in Kindergarten, first, and second grade. One question... DOES ANYONE KNOW HOW MUCH OF A DEVELOPMENTAL DIFFERENCE THERE IS BETWEEN A KINDERGARTEN STUDENT AND A SECOND GRADE STUDENT? Here comes the challenge. Time to see if six years of schooling and a life long love for art pays off.