Posts

Condiment Pop Art

Image
My first student finished the Pop Art lesson. I am so excited to show off her hard work! The students looked at multiple condiment containers and made prints using washable markers and damp paper. The bright colors look great... I am so excited to show you more pictures as students finish. LOVE THIS LESSON! Check back for more student work soon.

Shapes and Contour Lines

Image
My Kindergarten students learned about Contour Lines this week. I am looking forward to painting with these students soon, but for those who follow my blog I think you will agree that my Kindergarten students have improved their cutting skills (it is a night and day difference). With this project we traced, cut out shapes, and overlapped them on a large piece of paper. The next class I introduced them to contour lines. I talked about how I didn't want the contour lines to touch each other or cross. The students started next to a shape and mirrored the line drawn before. They did a great job!

Sneak Peek to 4th Grade Pop Art Prints

Image
I have to show off my students still life drawings to start off the Pop Art lesson.... Every students did an amazing job! We are making Andy Warhol inspired prints. To start out, the students drew still life drawings / contour line drawings of the condiment bottle at their table (each table had a different bottle). Once the students finished their drawings, I placed a piece of tracing paper over the drawing and the students traced what they had just drawn. The students will then take the tracing paper and flip it over making the image backwards and outline the drawing once again over a piece of foam. All this work will hopefully be worth it when the students see the final results with their printing plate of their backwards condiment container. Each student will print their image four times, with four different colors of ink.... Fingers crossed!

Picasso's Blue Period... Meets Guitar... Meets Collage

Image
My second graders were introduced to Pablo Picasso and his famous "Blue Period". We looked at a couple examples of Picasso artwork during the Blue Period, especially the "Old Guitarist." I got this idea from the blog Dalismustache (Thank You!). The lesson gave me a great opportunity to work with the concept of collage. The students started out with a large 24in x 10in piece of paper. We used tempera paint to paint the entire paper blue ( I gave the students blue and white paint to allow students to mix their own color blue). The next class, the students were given multiple colors of blue paper, white paper, black paper, blue burlap, newspaper, and blue and white wallpaper. The only directions I gave the students, was to be creative, use as many materials as possible, and not do the same thing as the person next to you. Once the students got to the point they didn't want to add anymore, then they were given a black sharpie to add designs. Once finished, the stude...

Hands-on approach to LINE

Image
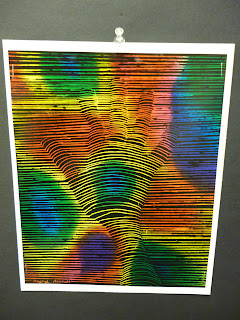
I wanted a lesson for my fourth grade that wouldn't take five weeks... I came up with this lesson introducing the students to the idea of line. We talked about what line is and what it isn't. We soon found out that line is way more than what it is not. I used scratch paper for the lesson. I figured by fourth grade the students had used scratch paper before... I guessed wrong. This was a super plus for me because when I used the scratch stick for the first time, my students eyed lighted up. It was Christmas and Thanksgiving in one.... The students were so excited to be given a ruler and stick. I had the students trace their hand with pencil (lightly). Next, the students took the ruler and drew the horizontal lines. When they came to the outline of their hand they skipped it and continued on the opposite side. Once the students finished the horizontal lines we talked about the impact of curved lines. Curved lines can make an object POP or look as if it is 3-D. The students starte...

Dinosaurs Love Underpants!

Image
I got this lesson idea from a good friend of mine who teaches in Peshtigo WI. (Thanks buddy). I started out the lesson by reading the book "Dinosaurs Love Underpants," If you haven't read the book ... go out and pick it up! The students loved the idea of the book, and loved learning how to draw dinosaurs. We started out drawing the dinosaurs shape by shape. I explained what side profile means and how we can only see one eye and nostril when something is viewed from the side. After they drew the dino's they used oil pastels to color them in. The next class the students created the background with oil pastels on black paper. The students loved how the colors popped on the black paper. Once the background was finished the students cut out their dino's. For the underpants, each student picked out a piece of scrapbook paper. We put the scrapbook paper underneath the cut out dinosaur and traced out the outline of the dinosaurs back end. The students cut out the traced b...

Welcome To The Secondary Colors

Image
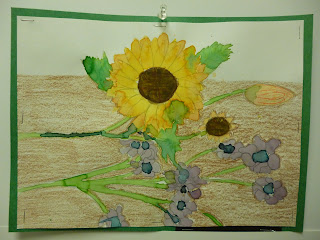
I only have one fourth grade class (The other art teacher I work with has the four others). This class has just finished their first project of the year. This pour class has missed four weeks worth of class, due to testing, severe storm watches, assemblies, and today a power outage due to five inches of wet snow. Well.... nine weeks later the secondary color still life painting lesson (long title...sorry) is finished. I started out the lesson talking to the students about the color wheel, and what colors make certain colors when mixed. I gave the students three watercolor tablets (red, yellow, blue). By only giving the student the primary colors they were forced to learn how to mix colors. We started out by mixing the secondary colors to make a color wheel. The next class, the students found their tables filled with fresh fruit (oranges, and grapes) and flowers (orange and purple flowers). We talked about the horizon line and correct proportions. I gave everyone a grape to put on thei...